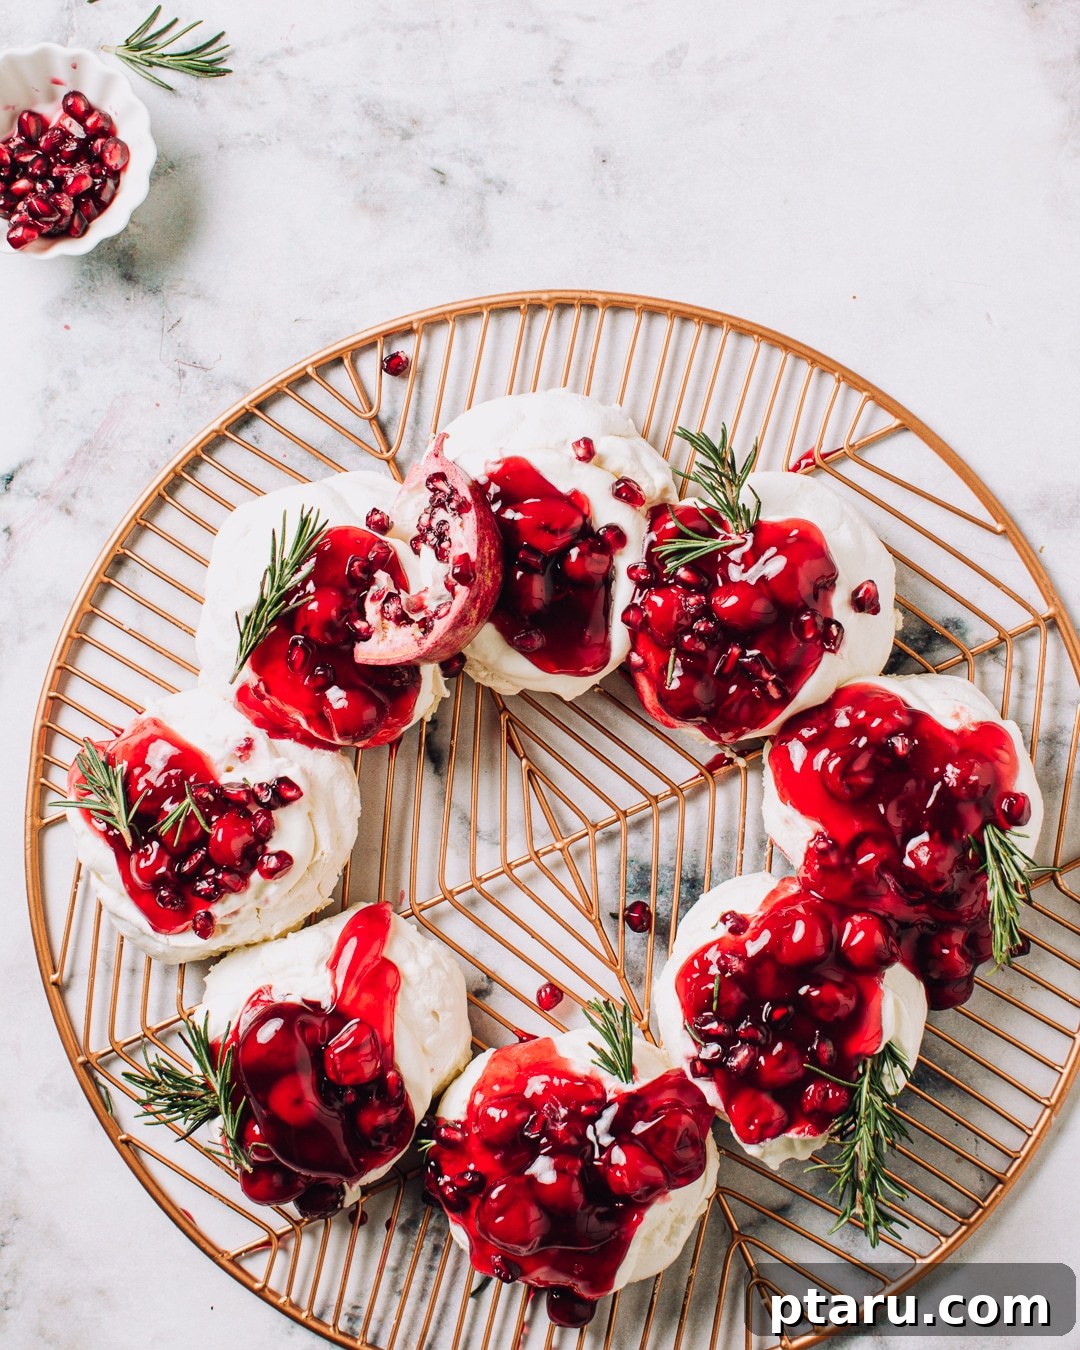
Festive Christmas Pavlova Wreath: Your Ultimate Holiday Dessert
Prepare to dazzle your guests this holiday season with a truly spectacular dessert: the Christmas Pavlova Wreath. This recipe transforms the classic pavlova into a festive masterpiece, shaped like a beautiful wreath, complete with fluffy whipped cream and a luscious cherry pie filling. Light, airy, incredibly creamy, and utterly delicious, this show-stopping dessert is guaranteed to be the centerpiece of your Christmas table and a delightful end to any holiday feast.
Pavlova, with its crisp meringue shell and soft, marshmallow-like interior, offers a delightful contrast in textures. When adorned with vibrant red cherry filling and a sprinkle of fresh green rosemary or pomegranate arils, it becomes an edible emblem of Christmas joy. Whether you’re an experienced baker or new to the art of meringue, our detailed guide will walk you through every step to create a perfect, impressive pavlova wreath that tastes as incredible as it looks.
Crafting the Perfect Christmas Pavlova Wreath
The journey to a perfect pavlova begins with a few key steps and careful attention to detail. Don’t be intimidated; with our guidance, you’ll master this elegant dessert.
The Meringue Base: Foundation of Fluffiness
For an ideal pavlova, starting with fresh egg whites in an impeccably clean mixer bowl is paramount. While pasteurized egg whites might seem convenient, they often lack the structural integrity needed for a stable meringue, frequently collapsing in the oven. Opting for fresh, room-temperature egg whites will yield the best results.
To further stabilize the meringue, an acidic component is essential. Cream of tartar is a classic choice, but you can easily substitute it with fresh lemon juice. This acid helps the egg whites achieve maximum volume and maintains their stability throughout the whipping process.
Begin beating the egg whites on a medium-low speed until they become foamy. This gentle start allows for gradual air incorporation. Once foamy, slowly begin adding the granulated sugar, a tablespoon at a time, while gradually increasing the mixer speed to medium-high. The key is patience; adding air or sugar too quickly can compromise the delicate structure of the foam, leading to a weaker meringue. Continue beating until the mixture is glossy, and stiff peaks form. To check if the sugar is fully dissolved, rub a tiny bit of the meringue between your fingers; it should feel smooth, not grainy. Finally, fold in the cornstarch and pure vanilla extract. Cornstarch contributes to the signature marshmallowy interior, while vanilla adds a lovely aroma and flavor, transforming a simple meringue into a culinary delight.
Shaping Your Festive Wreath
Creating the wreath shape is simpler than you might think. On a large sheet of parchment paper, trace a 9-inch circle using an overturned cake pan as a guide. Flip the parchment paper over onto a baking sheet, ensuring the pencil marks are visible from underneath to guide your piping. This prevents pencil lead from transferring to your meringue.
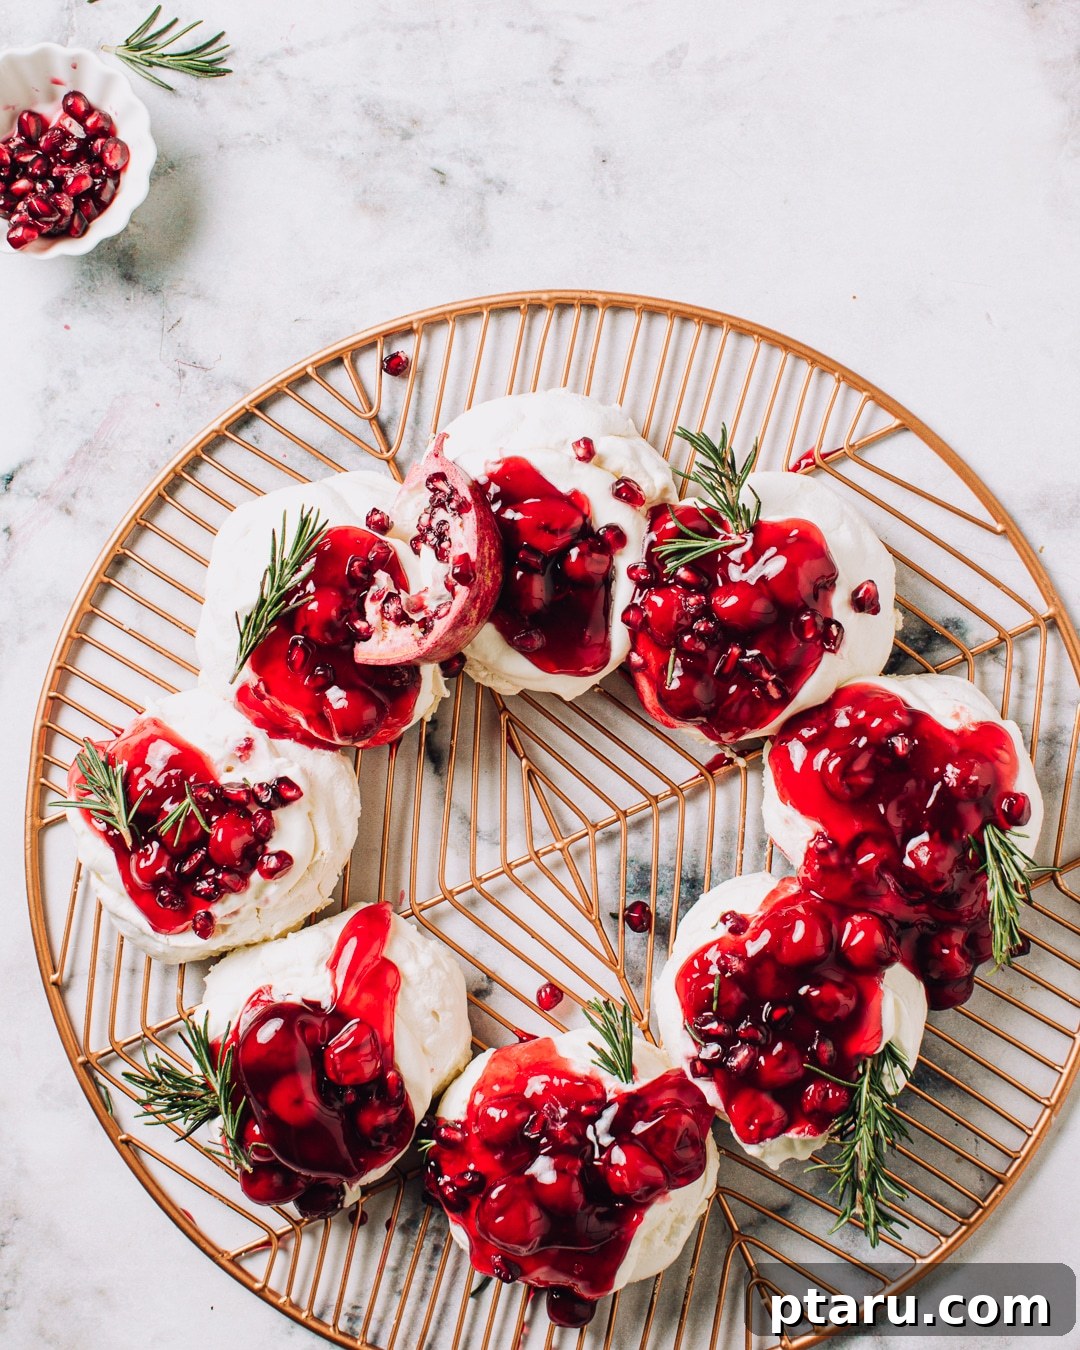
Using a large pastry bag fitted with a wide round tip (or simply a spoon), pipe or spoon eight distinct mounds of meringue around the traced circle, forming a beautiful wreath. Don’t worry about perfection at this stage; you can always add more meringue to even out the mounds. Once your wreath is formed, use the back of a spoon to create a gentle dip or well in the center of each meringue mound. These depressions will later cradle the luscious whipped cream and vibrant cherry pie filling, making your pavlova not only beautiful but also practical for serving.
Baking and Cooling for Optimal Texture
Baking pavlova requires a gentle touch and a low temperature to achieve its iconic texture: a crisp, pale exterior and a soft, marshmallowy core.
What is the ideal temperature for cooking pavlova?
Pavlova is best cooked at a low temperature for an extended period. Typically, 250°F (120°C) is the perfect setting. This low heat prevents the meringue from browning too quickly, allowing it to dry out and crisp up slowly without developing an unwanted golden hue. A higher temperature would cause the exterior to brown and set before the interior has a chance to achieve its characteristic soft, chewy texture, often resulting in a dry or overly crumbly pavlova.
How to determine if pavlova is fully cooked
A perfectly cooked pavlova will have a firm, crisp exterior that remains pale in color. When lightly tapped, it should sound hard and hollow. The true magic lies within: a soft, yielding, and wonderfully marshmallowy interior. If you were to insert a toothpick into the center, it would come out slightly sticky, indicating that marshmallowy goodness. To eliminate any doubt regarding doneness and, crucially, to prevent cracking, allow the pavlova to cool completely inside the oven with the heat turned off. This gradual temperature change minimizes thermal shock, which is a common culprit for cracked meringues.
Assembling, Storing, and Enjoying Your Pavlova
The final touches are what bring the Christmas Pavlova Wreath to life, but timing is everything to maintain its delicate perfection.
When is the best time to add cream to pavlova?
Resist the temptation to add the whipped cream and fruit toppings until just before you plan to serve the pavlova. Meringue, being hygroscopic, readily absorbs moisture from the air and from wet toppings. Applying cream too early will cause the crisp meringue to soften and lose its delightful crunch, becoming soggy. Furthermore, ensure the pavlova base is completely cool before adding any whipped cream. Warm meringue will cause the whipped cream to melt and turn into an unappetizing puddle.
Tips for storing your pavlova
A plain pavlova meringue base, without any toppings, can be stored in an airtight container at room temperature for one to two days. This allows you to prepare the base in advance, saving time on the day of your event. Once the whipped cream and fruit toppings have been added, the pavlova should be refrigerated and covered loosely. However, for the absolute best texture and appearance, it is always recommended to add toppings as close to serving time as possible.
How far in advance can you prepare Christmas pavlova?
You can prepare the pavlova meringue base one to two days ahead of time. Once baked and cooled, store it in an airtight container at room temperature. This makes holiday entertaining much easier! While you can add the cream and fruit up to four hours in advance, be aware that the whipped cream will gradually start to loosen its structure, and some fruit toppings might begin to slide off as they release their juices. For peak freshness and presentation, topping just before serving is ideal.
Can pavlova be frozen?
Freezing a pavlova once it has been topped with cream and fruit is generally not recommended. The moisture from the toppings and the freezing process will significantly degrade the texture of the meringue. While it is technically possible to freeze a plain meringue base, it’s not ideal. Upon thawing, the meringue will often weep moisture, losing its signature crisp exterior and becoming chewy or sticky. Additionally, pavlova is incredibly fragile, and freezing and thawing can make it even more prone to cracking or breaking into shards. It’s best enjoyed fresh.
Christmas Pavlova Wreath Recipe
Ingredients
For the Meringue:
- 6 large egg whites, at room temperature
- ⅜ tsp cream of tartar (or ½ tsp fresh lemon juice)
- 1 cup granulated sugar
- 2 tbsp cornstarch
- 1 ½ tsp pure vanilla extract
- ½ tsp coarse salt
For the Topping:
- ½ cup whipping cream (heavy cream), very cold
- ½ tsp pure vanilla extract
- 1 can (approx. 21 oz or 595g) quality cherry pie filling
- Rosemary sprigs (optional, for garnish)
- Pomegranate arils (optional, for garnish)
Instructions
- Prepare for Baking: Preheat your oven to a low 250ºF (120ºC). Line a rimless baking sheet with parchment paper. Use an overturned 9-inch cake pan or plate to trace a circle onto the parchment paper. Flip the paper over so the pencil marks are facing down on the baking sheet, ensuring no pencil comes into contact with the meringue. Set aside.
- Whip Egg Whites: In the very clean bowl of a stand mixer fitted with the whisk attachment, combine the room-temperature egg whites and cream of tartar. Begin beating on medium-low speed until the egg whites become frothy and bubbly.
- Gradually Add Sugar: Increase the mixer speed to medium-high. With the mixer running, slowly add the granulated sugar, about a tablespoon at a time, allowing each addition to dissolve before adding the next. Continue beating until the meringue is glossy, thick, and forms stiff peaks. You should be able to hold the bowl upside down without the meringue falling out. Test a small amount between your fingers to ensure the sugar is fully dissolved and the mixture is no longer grainy.
- Incorporate Flavor and Stabilizer: Gently beat in the cornstarch (sift it first if it’s clumpy to avoid lumps), pure vanilla extract, and coarse salt until just combined. Be careful not to overmix at this stage.
- Pipe the Wreath: Spoon the meringue into a large pastry bag fitted with a large round tip (alternatively, use a large freezer bag with a corner snipped off, or simply spoon the meringue). If using a pastry bag, place it inside a tall glass to hold it upright while filling.
- Form the Wreath Shape: Hold the pastry bag upright and pipe individual mounds of meringue around the traced 9-inch circle on the parchment paper. Continue creating mounds until you form a cohesive wreath shape. You can go back and add more meringue to any mound to create an even, full wreath.
- Create Wells: Once the wreath is formed, use the back of a spoon to gently create a small depression or well in the center of each meringue mound. These wells will be perfect for holding the whipped cream and cherry topping.
- Bake and Cool: Place the baking sheet with the meringue wreath into the preheated oven. Bake for 1 hour. After 1 hour, turn off the oven but leave the pavlova inside to cool completely for at least another hour, or even overnight. This crucial step allows the pavlova to dry out slowly and prevents it from cracking due to sudden temperature changes. The exterior should be dry and pale, and the inside delightfully marshmallowy.
- Prepare Topping: Just before serving, pour the very cold whipping cream into a clean stand mixer bowl (or use a hand mixer). Beat on high speed until soft peaks form. Whisk in the ½ tsp of pure vanilla extract.
- Assemble and Serve: Carefully transfer the cooled pavlova wreath to your serving platter. Spoon the freshly whipped cream into the wells of each meringue mound. Top generously with spoonfuls of cherry pie filling. For an extra festive touch, garnish with fresh rosemary sprigs and bright pomegranate arils, if desired. Serve immediately and enjoy!
Expert Tips for Pavlova Perfection
- Cleanliness is Key: Ensure your mixing bowl and whisk are absolutely spotless and free of any grease. Even a tiny speck of oil can prevent egg whites from whipping properly.
- Room Temperature Egg Whites: Separate your eggs when cold, as the yolk is firmer and less likely to break. Then, let the whites sit at room temperature for 30 minutes to an hour before whipping; they will achieve greater volume.
- Don’t Rush the Sugar: Adding sugar slowly allows it to dissolve properly, resulting in a stable, glossy meringue. If added too quickly, the meringue can be gritty and less stable.
- Don’t Open the Oven: Avoid opening the oven door during baking and cooling. Consistent temperature is vital to prevent collapse and cracks.
- Get Creative with Toppings: While cherry pie filling is wonderfully festive, feel free to experiment! Fresh berries (strawberries, raspberries, blueberries), passion fruit curd, lemon curd, chocolate shavings, or even a drizzle of caramel can transform your pavlova.
- Garnish for Impact: Rosemary sprigs and pomegranate arils add a beautiful contrast of color and texture, making your pavlova truly Instagram-worthy. A dusting of powdered sugar can also add an elegant touch.
Troubleshooting Common Pavlova Problems
- Weeping Pavlova: If your pavlova releases a syrupy liquid, it usually means the sugar didn’t fully dissolve, or it was overcooked. Ensure you beat until the sugar is dissolved and follow the cooking instructions precisely.
- Collapsing Meringue: This can be due to adding sugar too quickly, insufficient beating, or a sudden change in temperature during cooling. Always cool gradually in the turned-off oven.
- Cracking: Cracks are often caused by a rapid temperature change. The “cool in the oven” method is your best defense against this.
- Sticky Interior: If the interior is too sticky or dense, it might not have been baked long enough or at a low enough temperature.
The Christmas Pavlova Wreath is more than just a dessert; it’s a celebration of festive flavors and stunning presentation. With its delicate crunch, creamy texture, and vibrant toppings, it promises to be a memorable addition to your holiday traditions. Enjoy the process of creating this beautiful treat and the joy it brings to your loved ones.