Homemade English Muffins: The Ultimate No-Knead Recipe You Need to Try
There’s an undeniable joy that comes from fresh bread. For me, living just steps away from a wonderful local bakery means daily access to warm, crusty loaves, straight from the oven. This luxury has spoiled me, making it impossible to settle for bland, factory-produced supermarket bread. The quality, the aroma, and the sheer satisfaction of biting into a perfectly baked loaf are unparalleled. And when I crave something specific that the bakery doesn’t offer, like the delightful chew of a homemade English muffin, I roll up my sleeves and make it myself.
For far too long, English muffins were the one exception to my “fresh-only” rule. I’m not entirely sure why I hesitated; perhaps I simply hadn’t realized how incredibly simple they are to make at home. That oversight changed dramatically the day I decided to scrutinize the ingredient list on a package of commercially produced English muffins. What started as a promising list of basic components – “Whole Wheat Flour, Water, Yeast, Salt, Wheat Gluten, Canola Oil” – quickly spiraled into a chemical concoction.
The list continued with a perplexing array of additives: “glucose-fructose, calcium propionate, monocalcium phosphate, calcium sulphate, ammonium chloride, azodicarbonamide, diacetylated tartaric acid esters of mono- and diglycerides (a mouthful, literally!), calcium peroxide and ascorbic acid.” This extended roster of unfamiliar names, many of which serve as preservatives, dough conditioners, and artificial texturizers, was a stark reminder of why I choose homemade. The thought of consuming such a cocktail of substances with my breakfast was instantly unappetizing. That moment was my turning point; that bag of English muffins would undeniably be my last.
Say Goodbye to Store-Bought, Hello to Homemade Perfection
The revelation that followed was nothing short of a culinary awakening. I truly can’t believe I hadn’t ventured into making English muffins before. They are remarkably straightforward, practically making themselves with minimal effort. The results absolutely blow those rubbery, preservative-laden store-bought pucks out of the water. Homemade English muffins boast a delightful chewiness, a satisfying tang, and those coveted craggy crevices – often referred to as “nooks and crannies” – that are perfect for trapping melted butter, jam, or anything else you desire.
My first batch was a double batch, and I promptly froze half of them. Now, having a stash of these golden delights means I’m always prepared. Whether a sudden craving for a classic Eggs Benedict strikes, or I simply want a quick, wholesome breakfast, a freshly toasted homemade English muffin is always at the ready. This simple act of baking has transformed my breakfast routine, offering unparalleled freshness and flavor whenever the whim strikes.
The Magic of No-Knead Baking: English Muffins Edition
If you’re already familiar with the magic of no-knead bread, then you’ll find the process for these English muffins equally, if not more, enchanting. They share the same fundamental principle of minimal effort, but with the added bonus of significantly less waiting time. There’s no arduous kneading involved; you simply stir the ingredients together until combined, and then let the dough rest for about an hour. It’s an incredibly forgiving and accessible method, even for novice bakers. And if you haven’t yet delved into the world of no-knead bread, consider this your urgent invitation to embark on that culinary adventure – stat!
The beauty of this recipe lies in its simplicity. The dough is intentionally very wet and sticky – a characteristic that contributes to the muffins’ light, airy texture and generous nooks and crannies. This means you’ll need a generously floured work surface when it’s time to shape them. Don’t be shy with the flour; it’s your best friend here. I typically use a 3-inch biscuit cutter to create perfectly uniform circles, but a simple overturned drinking glass works just as effectively for cutting out the rounds. The key is to flour your cutter or glass too, to prevent sticking.
Mastering the Perfect English Muffin: Skillet-to-Oven Technique
The secret to achieving the quintessential English muffin texture – that wonderfully crisp exterior and soft, tender interior – lies in a two-part cooking process. The muffins are first cooked in a hot, cornmeal-dusted frying pan, and then transferred to the oven to finish baking. The cornmeal not only adds a subtle texture and flavor but also prevents sticking and helps create that signature slightly rough bottom. If you don’t have cornmeal, an extra dusting of flour or even wheat germ will work in a pinch.
It’s crucial not to skip the skillet step and attempt to shortcut them straight into the oven. Trust me, I’ve tried it, and the result was disappointingly flat buns rather than the glorious, risen English muffins you’re aiming for. The initial cook in the skillet achieves two vital things: it sets the exterior structure, preventing the muffins from spreading excessively, and it develops a beautiful golden-brown crust through the Maillard reaction, adding depth of flavor and texture. The subsequent baking in the oven ensures the muffins cook through evenly and achieve their full, fluffy rise without burning the exterior.
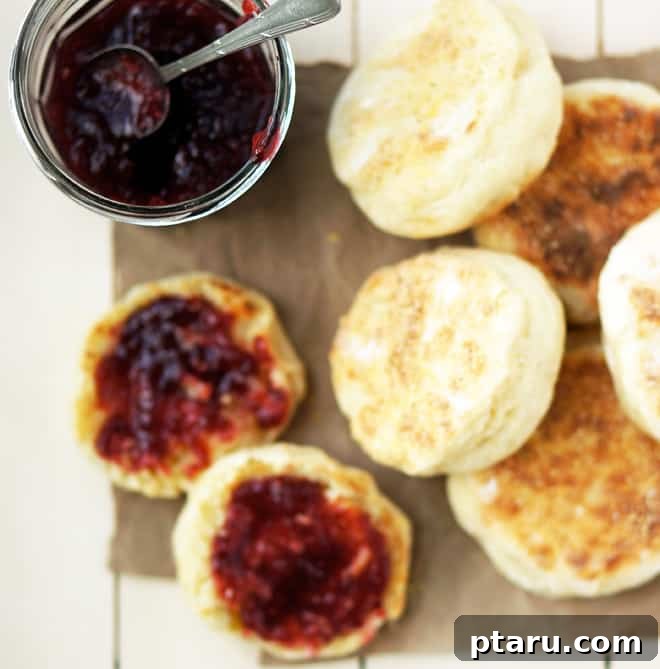
Once baked, homemade English muffins are a revelation. They are fresh, wonderfully chewy, and truly bursting with craggly crevices – those sought-after nooks and crannies that are just begging for melted butter to seep into every single one. To truly preserve this unique texture, always use a fork to split your English muffins. Gently stab around the circumference, then pry the two halves apart. If you succumb to the temptation of using a knife, you’ll slice through and lose all those delightful pockets and textures that make an English muffin so special!
My recipe also incorporates plain yogurt, a subtle but significant ingredient that serves a dual purpose. Firstly, it helps to mimic the delightful tang often found in traditional sourdough English muffins, adding a layer of complex flavor. Secondly, and equally important, the acidity in the yogurt contributes to an exceptionally soft and tender crumb, enhancing the overall chewiness and making these muffins truly irresistible.
Why Homemade English Muffins Are Worth Every Minute
Beyond the simple, wholesome ingredients and the easy process, making your own English muffins offers a multitude of benefits:
- Unbeatable Flavor and Texture: There’s no comparison between the fresh, rich taste and perfect chewiness of homemade versus mass-produced versions.
- Control Over Ingredients: You know exactly what goes into your food. No hidden sugars, no artificial preservatives, and no unrecognizable chemicals. Just simple, real food.
- Cost-Effective: Baking from scratch is often much more economical than buying premium store-bought baked goods, especially when buying in bulk or freezing.
- Culinary Satisfaction: There’s immense pride and enjoyment in serving something you’ve made yourself, especially when the results are this delicious.
- Versatility: Perfect for breakfast sandwiches, a base for Eggs Benedict, or simply toasted with butter, jam, or your favorite spread.
Ingredients for Your Perfect Homemade English Muffins
Gathering these simple ingredients is the first step towards enjoying your fresh, wholesome English muffins.
- 1 1/2 cup milk (whole milk recommended for richness)
- ¼ cup cold butter, cubed (unsalted is best for control over saltiness)
- 1 egg, beaten (room temperature eggs mix more easily)
- 1/4 cup plain yogurt (full-fat or low-fat, not Greek yogurt as it’s too thick)
- 4 cups all purpose flour (for a lighter texture; or 2 cups whole wheat, 2 cups all purpose for added fiber and nuttiness)
- 1 tbsp granulated sugar (feeds the yeast and adds subtle sweetness)
- 2 ¼ tsp instant or rapid rise yeast (equivalent to one standard packet)
- 1 ½ tsp salt (essential for flavor and dough structure)
- Cornmeal, for dusting skillet (or extra flour/wheat germ)
Step-by-Step Preparation: Crafting Your English Muffins
Follow these detailed steps to create beautiful, delicious English muffins right in your own kitchen.
- Prepare the Liquid Base: In a large, microwave-safe measuring cup or a small saucepan, gently heat the milk. If using a microwave, heat on high power for about 2 ½ minutes, or until it just begins to simmer at the edges. Be careful not to scald it. Stir in the cold, cubed butter until it is completely melted. This brings down the temperature of the milk. Allow the mixture to cool until it is just warm to the touch (around 105-115°F or 40-46°C). It’s crucial that it’s not too hot, otherwise, it will kill the yeast. Once warm, stir in the beaten egg and plain yogurt until well combined.
- Combine Dry & Wet Ingredients: In the bowl of a standing mixer (or a large mixing bowl if mixing by hand), combine the flour, granulated sugar, yeast, and salt. Give them a quick whisk to distribute evenly. With the mixer speed on low (using the beater attachment, not the dough hook for this wet dough), slowly add the prepared milk mixture to the dry ingredients. Beat for about 1 minute, scraping down the sides of the bowl as needed, until all ingredients are thoroughly combined and no dry streaks of flour remain. The dough will be noticeably very wet and sticky – this is exactly how it should be! Cover the bowl tightly with plastic wrap (saran wrap) and place it in a warm, draft-free spot to rise. Let it rise for a full hour, or until it has noticeably increased in volume and become bubbly.
- Shape the Muffins: Once risen, generously flour your work surface. You’ll need a good amount of flour to manage the sticky dough. Scrape the dough from the bowl onto the floured surface. Lightly flour the top of the dough, too. Using your floured hands, gently pat the dough down until it is about ½ inch thick. Take a floured 3-inch biscuit cutter (or an upside-down drinking glass) and press firmly to cut out rounds. As you cut, use a floured spatula or bench scraper to carefully pick up the English muffins and transfer them to a lightly floured baking sheet or a piece of parchment paper. Gather any dough scraps, gently press them together, pat them down again, and cut out more rounds until you’ve used all the dough. Once all the English muffins are shaped, cover them loosely with a clean kitchen towel or plastic wrap and let them rise again for another 20 minutes. This short second rise helps them get a final lift before cooking.
- Cook and Bake: While the muffins are undergoing their second rise, preheat your oven to 400 degrees F (200 degrees C). Simultaneously, place a large, heavy-bottomed skillet (or two, if you have them and want to cook more at once) over medium heat. Once hot, dust the skillet generously with cornmeal. Carefully place the English muffins into the heated skillet, ensuring they are about 1 inch apart to allow for expansion. Cook for 3-4 minutes per side, until the bottoms are beautifully golden brown and slightly crisp. Flip them over with a spatula and cook for another 3-4 minutes on the other side until similarly golden. As each batch is browned, transfer the English muffins to a baking sheet. Once all English muffins have been browned in the skillet, place the baking sheet in the center of your preheated oven. Bake for 7-10 minutes, or until they sound hollow when you tap their tops. This indicates they are cooked through.
Serving and Storage Tips
Your freshly baked homemade English muffins are now ready to be enjoyed!
- Serving: Remember the fork trick! Split them with a fork to reveal those glorious nooks and crannies. Toast them lightly and slather with butter and jam, honey, or marmalade. They are also the perfect foundation for elaborate breakfast sandwiches with eggs, cheese, and bacon, or, of course, the star of a homemade Eggs Benedict.
- Storage: Allow any unused English muffins to cool completely. Store them in an airtight container or zip-top bag at room temperature for up to 2-3 days. For longer storage, they freeze exceptionally well.
- Freezing: Once cooled, place English muffins in a freezer-safe bag or container, separating layers with parchment paper if stacking. They will keep well in the freezer for up to 2-3 months. To enjoy, simply remove from the freezer, thaw at room temperature, and then toast as desired.
Embark on this delightful baking journey and elevate your breakfast experience with these easy, incredibly delicious homemade English muffins. You’ll never look at a store-bought package the same way again!