

Irresistible Strawberry Hand Pies with Tender Cream Cheese Pastry
There’s an undeniable magic to the sight of plump, ruby-red strawberries at the peak of summer. Every time I encounter those vibrant local gems at a farmer’s market, I find myself unable to resist bringing a basket (or two!) home. Yet, a common lament among berry lovers is their fleeting freshness. These gorgeous little gifts of summer, despite their allure, typically only last a day or two in the refrigerator before sadly succumbing to sogginess.
Over the years, I’ve refined a couple of delightful strategies to extend their enjoyment and elevate their flavor. One simple secret is macerating them with sugar. Not only does this humble technique grant them a few extra days of deliciousness, but it also coaxes out their exquisite, naturally sweet, pink juice. These macerated berries are phenomenal with yogurt, spooned over ice cream, as a topping for cheesecake, or even simply spread on warm, buttered toast. For those curious, the term “macerating” refers to the process of sprinkling fruit with sugar to encourage it to release its juices. Just be sure to enunciate carefully if you decide to share this culinary term!
Discovering the Charm of Homemade Hand Pies
While macerating is a fantastic trick, sometimes the heart (and stomach) yearns for something a little more substantial, a little more comforting. This is where the sheer brilliance of baking them into pies comes in – specifically, these charming, rustic hand pies. Imagine a dessert perfectly sized for one, ideal for packing into a picnic basket, sharing effortlessly with appreciative neighbors, or, dare I say, even enjoying as a perfectly acceptable breakfast treat on a lazy weekend morning. Yes, pie for breakfast is not just allowed, it’s encouraged when it’s this good!
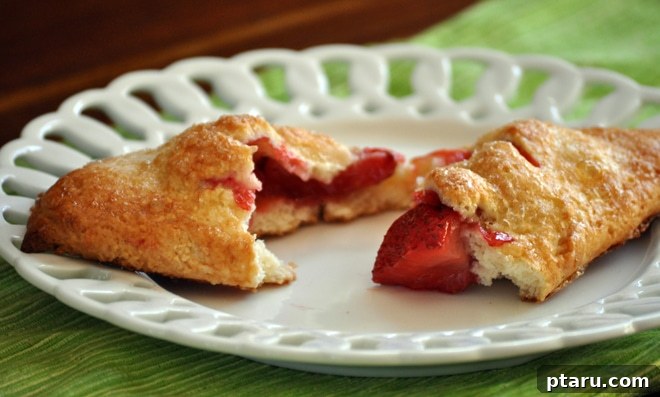
These delightful individual pies are more than just a convenient size; they are a celebration of homemade goodness. Each one is crafted with a unique cream cheese pastry, which offers a wonderfully softer, more tender texture than traditional pie crusts. Its rich, slightly sweet profile reminds many of a gourmet sugar cookie, making it an exquisite complement to the vibrant strawberry filling. As they bake, the sweet strawberry filling gently bubbles up through the carefully cut vents, creating an irresistible aroma and a beautifully “rustic” aesthetic that speaks of handmade charm and delicious anticipation.
The Magic of Cream Cheese Pastry: A Tender, Flaky Delight
What truly sets these strawberry hand pies apart is their incredible cream cheese pastry. Forget dry, crumbly crusts; this dough is a revelation. The addition of cream cheese results in a pastry that is exceptionally tender, rich, and incredibly flavorful. It bakes up golden brown with a delicate crispness, yet maintains a melt-in-your-mouth quality reminiscent of a premium sugar cookie. This unique characteristic makes it not just a container for the filling, but a star ingredient in its own right.
Working with this dough requires a little patience, as it tends to be softer and stickier than traditional butter-based pie crusts. The hour-long refrigeration period is absolutely crucial; it allows the butter and cream cheese to firm up, making the dough much more manageable for rolling and cutting. Should you find the dough becoming too sticky or difficult to handle during the process of cutting out rounds or transferring them to your baking sheets, don’t despair! A quick trip to the freezer for just a minute or two will firm it up wonderfully, making it perfectly workable again. This small trick ensures a smooth baking experience and guarantees beautifully shaped hand pies every time.
Crafting Your Rustic Strawberry Hand Pies: A Step-by-Step Guide
The exact number of strawberry hand pies you’ll achieve from this recipe can vary slightly, depending on how thinly you roll your dough and the size of your chosen circular cutter. For instance, if your dough is closer to 1/4 inch thick rather than the recommended 1/8 inch, you’ll likely yield fewer, albeit delightfully plump, pies. Similarly, the amount of luscious strawberry filling you can nestle into each pastry circle depends on its size. While the recipe suggests approximately 2 tablespoons per pie, don’t hesitate to adjust based on your preference and the dimensions of your dough. This truly is an imperfect science, but rest assured, the results will be utterly delicious no matter what! From my own experience, I typically get about 10 pies, occasionally with a handful of macerated strawberries remaining. In hindsight, I often find myself wishing I had been a little more generous with the filling, perhaps even pushing the limits if the pastry threatened to tear slightly. Remember, the berries soften and reduce significantly in the oven, and after all, we’re embracing the charmingly “rustic” nature of these homemade treats!
Strawberry Hand Pies with Cream Cheese Pastry
Adapted from Martha Stewart
- 3 cups all-purpose flour
- 1/4 tsp baking soda
- 1 tsp baking powder
- 1/2 tsp salt
- 1/2 cup unsalted butter, softened
- 1 1/3 cups granulated sugar, divided
- 1 large egg
- 3 oz cream cheese, softened (approximately 1/3 cup plus 1 tablespoon)
- 3 tbsp cream, milk, or buttermilk
- 1 tsp pure vanilla extract
- 4 cups fresh strawberries, washed, hulled, and quartered
- 2 tbsp cornstarch
- 1 large egg white, lightly beaten (for egg wash)
- 2 tbsp coarse or raw sugar (for sprinkling; regular granulated sugar works fine too, but coarse sugar adds a lovely sparkle and crunch)
Detailed Instructions
1. Prepare the Dry Ingredients: In a medium-sized bowl, thoroughly whisk together the all-purpose flour, baking soda, baking powder, and salt. Whisking ensures these dry ingredients are evenly distributed, which is crucial for the pastry’s texture and rise. Set this mixture aside for later use.
2. Prepare the Cream Cheese Dough: In the large bowl of a standing mixer fitted with the paddle attachment, cream together the softened butter and 1 cup of the granulated sugar on medium speed until the mixture is visibly light and fluffy. This aeration process is vital for a tender pastry. Add the egg and continue to beat until fully incorporated and smooth. Next, add the softened cream cheese, cream (or milk/buttermilk), and vanilla extract. Beat on low speed until just combined; avoid overmixing. Gradually add the reserved flour mixture to the wet ingredients, mixing on low speed until the flour is just incorporated and no dry streaks remain. The dough will be soft. Carefully scrape the dough out onto a large sheet of parchment paper or waxed paper laid on your counter. Using the parchment paper to avoid direct stickiness, gently form the dough into a ball, then flatten it into a disk shape. Wrap the dough disk tightly in the parchment paper and refrigerate for at least 1 hour. This chilling period is critical for developing the dough’s texture and making it manageable to roll.
3. Prepare the Strawberry Filling and Baking Sheets: While the dough is chilling, prepare your delicious strawberry filling. In a medium-sized bowl, gently combine the quartered strawberries with the remaining 1/3 cup of granulated sugar and the cornstarch. The sugar will help draw out the berries’ natural juices, while the cornstarch will thicken these juices during baking, preventing a soggy filling. Set the bowl aside. Next, line two large baking sheets with parchment paper or waxed paper. This will prevent the pies from sticking and ensure easy cleanup.
4. Roll and Cut the Dough: Once the dough has chilled for at least 1 hour, preheat your oven to 375°F (190°C). To prevent your parchment paper from sliding while rolling, slightly dampen a sheet of paper towel and lay it flat on your counter. Place one sheet of parchment paper on top of the damp towel, then place the chilled dough disk on top of that. Cover the dough with a second sheet of parchment paper. Roll out the dough evenly between the two sheets of parchment to approximately 1/8 inch thickness. This thickness yields a delicate yet sturdy crust. Use a large (about 5-inch) circular cookie cutter, or any similar-sized round object you have on hand (like a small bowl or jar lid), to cut out circles. If the dough becomes too sticky to work with at this stage, simply transfer the parchment with the dough circles onto a baking sheet and pop it into the freezer for about 2 minutes until slightly firmed up. Using a thin metal spatula, carefully lift the dough circles and transfer them to the parchment-lined baking sheets, spacing them about 1 inch apart. Gather any dough scraps, gently form them into a new ball, re-chill if necessary, and repeat the rolling and cutting process until all dough is used.
5. Assemble, Seal, and Bake the Pies: Lightly mash the strawberry mixture with a fork or a potato masher; this helps release more juice and ensures a tender filling. Spoon approximately 2 tablespoons of the strawberry filling onto one half of each dough circle, leaving a small border around the edge. Carefully fold the other half of the dough circle over the filling, creating a half-moon shape. Gently but firmly pinch the edges together to seal, you can also use the tines of a fork to create a decorative, crimped edge. Brush the top of each pie with the lightly beaten egg white; this will give them a beautiful golden sheen and help the sugar adhere. Sprinkle generously with coarse or raw sugar for an extra sparkly finish and delightful crunch. Using sharp kitchen scissors, snip two small vents on the top of each pie. These vents are crucial; they allow steam to escape during baking, preventing the pies from bursting open. Bake for 20-25 minutes, or until the pastry is golden brown and the filling is bubbling. If baking two pans simultaneously, rotate them halfway through to ensure even browning. Once baked, transfer the hand pies to a wire rack to cool completely. Cooling on a rack prevents the bottoms from becoming soggy.
Tips for Success and Creative Variations
To ensure your hand pies are always a triumph, remember to work with chilled dough; a firm dough is a happy dough. Don’t be afraid to put it back in the freezer for a minute or two if it becomes too soft. When filling, aim for a generous but not overflowing amount of strawberries. A little bubbling of the filling is part of their rustic charm! These pies are incredibly versatile; while strawberries are divine, consider experimenting with other seasonal fruits like blueberries, raspberries, or even thinly sliced apples or peaches for different flavor profiles. A pinch of cinnamon or nutmeg can also elevate the fruit filling. Once baked and cooled, these hand pies store wonderfully in an airtight container at room temperature for up to 2 days, or in the refrigerator for up to 4 days. For longer storage, they freeze beautifully for up to a month; simply thaw and warm gently in the oven for a freshly baked experience.
Enjoying Your Homemade Masterpiece
There’s a profound satisfaction in creating something so delightful from scratch, especially when it involves the best of summer’s bounty. These homemade strawberry hand pies, with their tender cream cheese pastry and luscious, bubbling berry filling, are more than just a dessert; they’re a little parcel of joy. Whether you’re enjoying one with your morning coffee, sharing them at a summer gathering, or simply treating yourself to a moment of sweet indulgence, these rustic hand pies are sure to become a cherished addition to your recipe collection. Embrace the joy of baking, and savor every tender, fruit-filled bite!